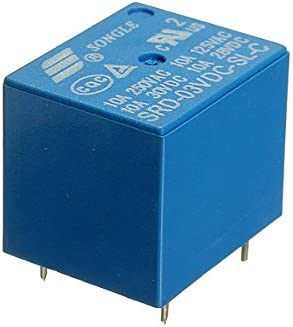
Simplify Your Life: Using a Relay Module

Simple relay

A Relay

Today’s blog is on a simple topic, but one that comes up a lot, and  may be of use, especially to beginners. Many projects involve controlling a higher voltage device or devices based on an external event triggered by a sensor, such as a PIR. And to control the higher voltage device, a relay is used. Along with the relay, you’ll need a transistor to provide adequate current to drive the relay, a diode to protect from reverse currents when the relay switches off, and probably a resistor to limit the current draw. This is simple enough, but another option is to use a relay module. The module combines a relay along with these other components into one simple package.

Depending upon your application, you may also put some sort of timer circuit, or a microcontroller such as an Arduino, or a single board computer (SBC) like a Raspberry Pi between the sensor output and the relay input. This lets you implement more complex logic than simply having the relay echo the output from the sensor. For example, one could have a light toggle on or off each time the sensor is triggered. Or, when triggered, one could have a device stay on for a set amount of time before turning off. Or even  more complex actions. But if you don’t need the added logic, you can use the sensor directly, without a microcontroller or SBC.

The output voltage from the sensor or controller board must be high enough to trigger the relay, but voltage alone is not enough. The driving device must also be capable of supplying enough current. This is often not the case for either sensors or computer boards. They lack the power to drive many relays.

Relay and driver circuit, showing transistor, diode, and resistor

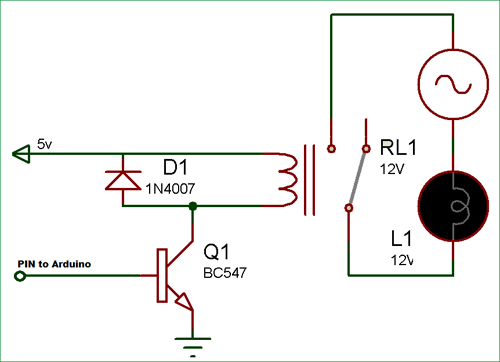
Relay and Driver Circuit

The solution is to use a transistor. The sensor or board switches on and off the larger current flow through the transistor, and this, in turn, drives the relay. In addition, one needs a resistor to limit the current drawn from the sensor or controller and a “flyback” diode to protect both devices and the transistor from reverse currents when the relay turns off. This is shown in the figure, taken from Circuit Digest’s Arduino Relay Control Tutorial.

You can learn more about a relay and the relay driver circuit in the article How Electrical Relays Work at Circuit Basics.
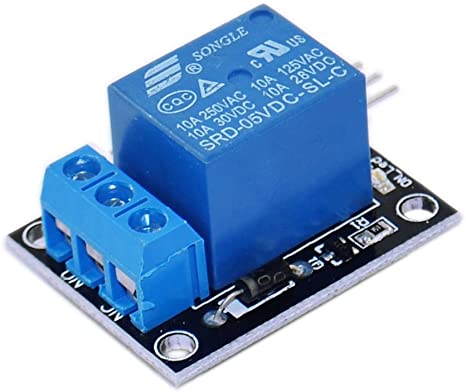
 

Relay Module Board

Relay Module

But rather than using discrete components, there’s another option which is often quicker and easier: the relay module. A relay module combines all of these elements into a single board. It may include additional features, such as an LED to indicate when the relay is triggered. In this way, you only need your sensor, optionally a controller for more complex logic, and the relay module. No discreet diodes, transistors, or resistors required. I’m using the one discussed in this article, along with a PIR sensor, to trigger the “Try Me” switch on a Halloween prop. Although the signal output for the PIR is 3.3V and the relay is a 5V input signal relay, it seems to work just fine. As you can see, it’s the same relay, mounted onto a circuit board along with the transistor, resistor, diode, and indicator LED. In addition, the signal side inputs are connected to 3 male pins for easier connections. The pins are spaced so that they will fit into a standard breadboard or for connecting a standard 3-wire servo cable.

So the next time you need to trigger a higher voltage AC or DC device, reach for a relay module.

Calibration for 3-axis accelerometer and magnetometer

For my latest project, I’m using an 3-axis accelerometer / magnetometer, specifically Adafruit’s Triple-axis Accelerometer+Magnetometer (Compass) Board that uses the LSM303DLHC chip. .

The 3-Axis Magnetometer and Accelerometer Board

The 3-Axis Magnetometer and Accelerometer Board


My specific project may not require much precision, but I still decided it would be a good idea to calibrate the outputs. There are a number of  both sophisticated and simpler tools for magnetometer bias measurements, but I wanted a simple solution I could run on my headless Pi zero W and that dealt with calibrating both the magnetometer and accelerometer.  An excellent discussion that I borrowed heavily from is the blog post “How to Calibrate a Magnetometer.”

There are two general types of distortions in the outputs. One is a straight shift (bias) in a given direction, while the other distorts the response. The former is the easiest to deal with computationally. One can rotate the unit around all axes (a figure 8 movement with rotation is what I use) and measure the minimum and maximum values reported for the 3 axes (six values in all). If there is no bias, the absolute values for the + and – direction of each axis would be the same. If the response is shifted towards one or the other, there’s a bias present. One can simply compute the average of the min and max for each axis, and then subtract that value from the reported output for that axis.

plot showing an offset circle.

Offset bias. Called “hard iron distortion” in a magnetometer, as it is often due to the presence of exterior ferrous substances. (source: Vectornav)

The other type of error distorts the shape of the response. 3D matrix algebra is needed to fully address this type of error, but a simpler approach that provides an approximate correction is to just look at the 3 axes. Calculate the average delta between the maximum and minimums for each axis, then compute the scaling factor for each individual axis that scales the delta for that axis to match the average.

Plot showing rotated and offset ellipse

Plot showing both offset bias and non-linear response. The non-linear response is called “soft iron” bias in a magnetometer. (source: Vectornav)

My code then does the same thing for the accelerometer. For that calibration, you want to slowly (so as not to introduce large motion accelerations) position the board so that each of the 6 faces points up while the calibration program is running.

One that is done, the code then writes the magnetometer and accelerometer offsets and scaling factors for each axis (so 12 values in total) to a .ini file so that they can be called and used by the application program that will be making the measurements.

In my initial measurements, I found appreciable bias errors for the magnetometer (on the order of 12%), with much smaller bias errors for the accelerometer (on the order of 1.5%). The scaling factor corrections were  smaller for the magnetometer than the bias (the correction factors were 7.5%, 1%, and 6%). For the accelerometer, I measured 0.03%, 6%, and 5.5%).

The code is published at https://gist.github.com/ViennaMike/d8b8f9636694c7edf4f115b28c9378c0